
5G: Worldwide Weltschmerz
October 29, 2021
COOL IT DOWN!
November 10, 2021- acoustic guitar lessons
- basic music theory
- beginners music theory
- box scales
- easy guitar lessons
- easy music theory
- electric guitar beginner lessons
- first guitar lessons
- first lessons in guitar
- guitar beginner lessons
- guitar chords
- guitar scale box patterns
- how to form a chord
- how to learn music theory
- how to make a scale in music
- how to practice guitar
- how to practice scales
- how to use intervals to form scales
- indian guitar lessons
- intervals
- intervals and scales
- learn guitar easily
- major scale
- major scales box patterns
- minor scale
- minor scale box patterns
- new to guitar
- scale box patterns for guitar
- scales
- starting guitar again
- what are intervals and scales
- what are intervals in music
Music Theory 3: Minor Scale Box Patterns
also, see Music Theory 2: Major Scale box Patterns.
Just like the box patterns of the Major Scale, the minor scale box patterns simplifies learning and practicing the scale by breaking it down into digestible portions.
Natural or Relative minor
This is the minor scale in its most basic form. Every Major scale has a ‘relative’ minor. G major has one sharp (F#). Its relative minor is Em, which also has one sharp (F#).
The notes of Em are exactly the same as G major, just starting on E. This is the ‘natural’ minor.
The same holds true for C Maj and its relative minor Am.
“Please visit Music Theory 2 to prepare your self for this section. Some instructions, like finger placement, would not be repeated here because if the concept is understood it can be implemented on your own. This is the objective, to get you to figure some of the things out for yourself so that you could implement the learning wherever you need to.“
Adequate repetition would firmly integrate the patterns into your muscle memory resulting in faster playing and a better selection of notes while soloing.
Remember:
Always practice with a Metronome. Start at a very slow tempo ensuring that each note is clear and is played in time with the beat. When you achieve this at a certain tempo, increase it by 5 BPM. That’s how you increase your speed and it WILL increase.

The Minor Scale interval is:
Whole–Half–Whole–Whole–Half–Whole–Whole.
Take a look at the diagram above, it includes all the notes of the Am scale on the fretboard of a guitar.
It can be confusing when you look at all the notes at the same time.
BOX SHAPES
This is where Box Shapes or Patterns comes into play. The Major scale is broken down into a set of patterns that together make up the entire scale but individually make it easier to learn.
Once all the patterns are memorized, it would combine to be the entire scale.
A-Minor Scale notes:
A – B – C– D – E – F – G – A (return to root)
Pattern One:

to start you off, I will explain the first one in a bit of detail. The Am scale would, obviously, start with A as the root note.
We do know that on the 6th string, that would be fret 5, represented by the green spot.
The diagram, a part cut from the entire fretboard above, shows you the first pattern of the Am scale.
The string lowest in the diagram, the 6th string with A in the first position, is the thickest (6th) string and the string at the top of the diagram is the thinnest (1st) string.
As you can see, the scale repeats itself twice, first from the 6th to the 4th string and again from the root on the 4th string to the 2nd.
Note: Two extra notes on the 1st string are included as they are part of the notes in the Am scale, viz. B and C on the 6th string. This is purely for continuity.
The true scale is from the root A on the 6th string to G on the 4th and the second octave starting from the root A on the 4th to the G on the 2nd.
The 1st string in this case with the root A in the first position is incomplete.
How to play it:
In what sequence do I practice?
If you have gone through the blog on the Major scale you would know finger placements, here is a gist.
The 6th string: the root is played with the 1st finger followed by the ring and pinky, so that is 1, 3, and 4. Same with the 5th string.
On the 4th string: the first note G is played with the first finger but the second, A, is played with the 4th. Giving you 1and pinky as the fingers used. This is to accommodate the stretch of the first finger to the first note on the 3rd string.
The 3rd string would follow 1, 2 and pinky. Same with the 2nd string.
Finally, the 1st string would follow the 1, 3 and pinky.
Remember to follow alternate picking. Also, play it in reverse from the 1st string to the 6th.
Pattern Two:
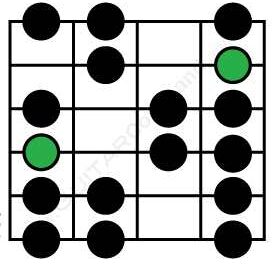
This pattern starts off on the 7th fret of the Sixth string which is the note B.
Note: the patterns overlap each other to maintain continuity between the box patterns. This gives rise to some confusion on the internet as some sources mention 4 patterns per scale and others upto 7 patterns. They are essentially the same thing: do not confuse yourself with this.
Pattern Three:

This pattern is from the 10th fret 6th string which is D.
Pattern Four:

12th fret
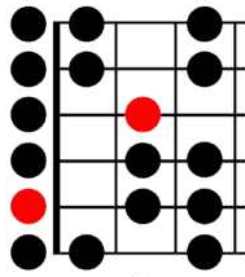
neck position
On a two-octave fretboard, this pattern would continue past the 12th fret. On a single octave acoustic, this pattern moves over to the neck of the guitar and includes the open string notes in the scale pattern.
The notes of both patterns remain the same, only the octave changes when played past the 12th fret.
Pattern Five:
And the final pattern starting on G, 3rd fret on the sixth string,
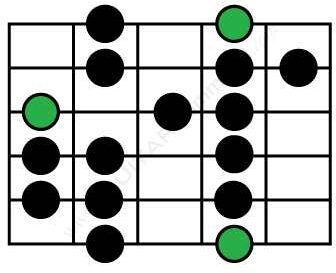
will lead back to where we started; the 1st pattern.
We have completed a full circle of an acoustic one-octave fretboard.
For a two-octave fretboard: this pattern will follow Pattern 4, mentioned above which starts on the 6th string, 15th fret, note G.
It will also follow the pattern 4 at the neck, starting on the 6th string 3rd fret, G.
Take a look at the entire fretboard in the A minor scale diagram at the start of this blog and look at the sections within it. I am sure you will be able to see how the pattern repeats itself.
The Natural or relative minor is the most common scale used in music. There, however, exists two variations of the natural minor that exist.
The Harmonic minor and The Melodic minor scales.
Start with the natural minor, because it is the easiest to learn and remember, and it’s also the most common minor scale used in popular music.
You could then progress to the variations.
Also Read: Harmonic and Melodic minor


